Thursday, September 19, 2013
GOOD OLD SLOPPY JOE's
These days, with the kids all gone, I still make a big batch of Sloppy Joes (seems like I can only make our family favorites in BIG BATCHES for some reason).
These days, I freeze portions in Ziploc bags (patted to a 1" thick flat shape so it thaws quickly). I love "instant" meals like this.
1 pound lean ground beef (I use 90% lean)
½ cup chopped onion
1/3 cup chopped celery
1/2 cup chopped bell pepper
1 cup shredded carrot
2/3 cup ketchup
½ cup water
2 tablespoons Worcestershire sauce
1/8 teaspoon red pepper sauce (see note)
1 teaspoon salt
¼ teaspoon black pepper
5 hamburger buns, split and toasted
Cook the hamburger and onion together, chopping up the meat as it cooks (drain meat well).
Stir in remaining ingredients (except buns). Simmer on med-low for about 20 minutes (to reduce the consistency of the sauce). Fill the hamburger buns with the beef mixture and serve.
NOTE: After this is cooked, it keeps well in the crockpot if your dinner hour is uncertain.
NOTE: I serve these with a slice of cheese under the meat mixture and a squirt of yellow mustard on top of the filling (our favorite).
NOTE: I never have red pepper sauce on hand, so I always use a pinch of dry red pepper flakes instead.
Wednesday, August 14, 2013
CRAB CAKES (ALMOST)
That's my wordy way of saying "YES, we eat (and enjoy) Surimi" (fake crab). The following recipe is quick, easy and economical.
CRAB CAKES
1 egg beaten
2 1/2 tablespoons mayonnaise
2 teaspoons Dijon mustard (I use honey Dijon)
1 teaspoon Worcestershire sauce
1/4 teaspoon pepper
1 teaspoon old bay seasoning
1/4 cup VERY finely chopped celery
2 tablespoons fresh parsley
1 pound crab lump meat (I use Surimi)
1/2 cup Panko bread crumbs
Line a baking sheet with wax paper. If you are using Surimi, dice it up fairly small, but not shredded.
In a medium size bowl, beat the first 8 ingredients until very smooth. Stir in the crab (Surimi) and bread crumbs until well mixed.
Using a half cup measure, portion out and shape patties and place them on the waxed paper (makes 6 patties). Cover and chill at least an hour.
The hour wait time is important for flavors to meld AND for the bread crumbs to soften enough so that the patties stay together.
Heat 1/4 cup vegetable oil with a tablespoon of butter and fry the patties until golden brown (3-5 minutes per side).
Tuesday, June 18, 2013
CHUCK ROAST SLOPPY JOES IN THE CROCK POT
Heat makes me lazy, which is another reason I love my slow cooker..... I just put the meat and veggies in the crock pot, early in the day, and forget about it. Not only does my house smell wonderful, but meal time is a snap; a stack of burger buns next to the crock pot and a bowl of potato salad and I have a meal fit for company (well, MY kind of company any way).
A browned chuck roast cooks low and slow with veggies and seasonings until it is fall-apart-tender. Thicken the sauce a little (right in the crock pot), then put the shredded beef back in and you have a heavenly sandwich.
Personally, I like a swirl of yellow mustard on mine, how do you like yours?
CHUCK ROAST SLOPPY JOE'S
2 pounds lean beef chuck roast (trim any large fatty areas)
1 cup chopped onion
2/3 cup chopped celery
2/3 cup green pepper
2/3 cup ketchup
½ cup water
2 tablespoons Worcestershire sauce
¼ teaspoon red pepper sauce
1½ teaspoons salt
½ teaspoon black pepper
1 teaspoon mustard powder
Brown the beef chuck roast in a frying pan, then place in a slow cooker. In the same frying pan, saute the vegetables until the onions are almost transparent. Put the vegetables in the slow cooker.
In a bowl, mix the rest of the ingredients and pour over the meat and veggies. Cook on high for 4 to 5 hours or on low for 8 hours. It isn't necessary, but I turn the meat over a couple of times during cooking and spoon the sauce over the meat.
Thirty minutes (or so) before serving, thicken the sauce with a slurry of 1 tablespoon cornstarch and 1 tablespoon of water. Cut the beef into sandwich slices (or just pull it apart) and top with some of the sauce. OH SO GOOD!!
NOTE: My slow cooker took only 4 hours on high to make the meat extremely tender, but still slice-able. If you like your beef more like pulled pork, cook it on high for 5 hours.
NOTE: Browning the meat and veggies isn't absolutely necessary, but it sure improves the overall taste.
NOTE: This is a re-post of one of my original recipes from 2011.
Saturday, April 6, 2013
AVOCADO EGG SALAD
Personally, I enjoyed this salad just wrapped in a big leaf of lettuce, but Picky-Picky husband went for the traditional sandwich.
4 hard boiled eggs, peeled and chopped
1 large ripe avocado
2 stalks celery chopped finely
1/3 cup diced tomato flesh (see note)
2 tablespoons prepared yellow mustard (see note)
salt to taste (I just added a pinch)
pepper to taste (see note)
NOTE: NO MAYONNAISE!!
Cut the avocado in half, remove the pit and mash the flesh (I mashed about 3/4 of the flesh into a smooth paste and left 1/4 of the flesh in little chunks.
Stir the prepared yellow mustard, salt and pepper into the mashed avocado, mix well.
Add the chopped eggs, celery and tomato and stir gently until well mixed. That's it!!
NOTE: I wasn't sure how to explain "tomato flesh"; it just means leave out the juicy-seedy part of the tomato.
NOTE: Two tablespoons of yellow mustard is going to seem like a lot, but the final product does NOT taste overly mustardy, trust me. I just used plain old yellow hot dog mustard.
NOTE: I cook with coarsely ground black pepper, so I used a scant
half teaspoon. If you use finely ground pepper (it measures differently) use less.
NOTE: I put this salad in the fridge for several hours without any avocado darkening problems because I laid plastic wrap right on the surface of the salad and pressed down a little to force out all of the air. I'm not sure if it would turn dark overnight because it never lasts that long at our house.
Saturday, February 16, 2013
FLOUR TORTILLAS
Most tortilla recipes require the same basic ingredients: flour, baking powder, salt, lard or shortening and hot water. Where the recipes differ is in technique and that is something that just takes practice;I found some GREAT tortilla making tutorials on "You Tube", those people have it down to an art!!!
3½ cups all purpose flour
1 teaspoon salt
2 teaspoons baking powder
1 teaspoon kosher salt
6 tablespoons Crisco or lard (see note)
1+ cup very hot water (see note)
Mix the dry ingredients and cut the Crisco or lard into the flour with a pastry cutter until you get what looks like corn meal (same technique as you would for pie crust).
Make a depression in the middle of the dry ingredients and slowly add the HOT water a little at a time, mixing in the dry ingredients as you go. Stir until everything comes together then knead it by hand (or stand mixer) for 2 minutes.
Cover and let the dough rest for an hour. Shape the dough into ping pong ball size balls, cover again and let rest for 15 minutes. This will make them easier to roll out.
Roll the tortillas out on unfloured counter. It's hard to get them perfectly round at first, so don't worry about that; they taste great no matter what their shape is.
What IS frustrating is how thin you need to roll them; roll them as thin as possible. The tortillas in the photo above were rolled thin enough that I could see the color of my counter through the dough, and yet, when you cook them, they don't stay that thin; keep that in mind.
To cook them, heat a cast iron pan (I like to use my electric skillet) to about 375° to 400° DO NOT USE OIL at this stage. Put the tortilla on the hot surface. As soon as you see little bubbles appearing in the tortilla (it will depend on how thick you rolled them), turn it over. You want the little bubbles to turn light brown, so watch your heat and raise/lower it if necessary; if the tortillas super-puff up, just gently press on them with the flat of your spatula. Don't over-cook them or they will get brittle.
Place cooked tortillas in a clean warm towel. You can use them right away or wrap them well and keep them in the fridge for up to a week; you can also freeze them.
I hope I haven't scared you off because home made tortillas are seriously delicious. Your first batch won't be beautiful, but don't let that discourage you. It really is fun (get the kids to help!!) and each batch comes out prettier than the last.
NOTE: The recipes I found called for lard or shortening (Crisco). I don't have lard in my pantry, but I had great results with butter flavored Crisco. I even made some with real BUTTER and they were great too. Some recipes call for vegetable oil, but I haven't tried that yet.
NOTE: Don't be afraid to add a little extra hot water to get a nice smooth dough. I live in a very dry climate and I had to add almost an extra 1/4 cup of hot water. You want your final dough to feel soft and pliable but not sticky.
NOTE: Recipe makes 8 burrito size tortillas or 12 regular/small size tortillas.
NOTE: I like the idea of making little tortillas for our youngest grandchildren!!
Monday, January 7, 2013
BAKED MEATLOAF BURGERS
With that in mind, I decided to try "baked meatloaf burgers" and they were a big hit; we ended up with the best part of the meatloaf in EVERY sandwich!!
healthy pinch of black pepper
Friday, August 17, 2012
BEST MEATBALL SANDWICH EVER !!
For the full size sandwiches, use hogie rolls, or for a crowd, small dinner rolls make great meatball sliders!!

This recipe will feel a crowd, so if you are just feeding the family, cut it in half. Better yet, make the whole recipe and mix the leftovers (the next day) with pasta and parmesan!! I love "day two" recipes.
MEATBALLS
2 pounds of lean ground beef (90% lean)
1 cup dry breadcrumbs (toasted under broiler)
4 tablespoons fresh parsley (minced)
2 cloves minced garlic
1 cup chopped onion sautéed
2 eggs
2 teaspoons salt
½ teaspoon black pepper
Sauté chopped onion and garlic until the onions have mellowed and become a little sweet. Mix them in with all of the other meatball ingredients. Form into 2” meatballs and place on a cookie sheet (that has a rim) and bake at 350° for 15 minutes. Remove from oven and drain. Set aside.
SAUCE
Even if you cut the meatball ingredients in half...do not cut the sauce in half. You can make this sauce on the range or in the crockpot.
In large deep pan, sauté ½ cup chopped onions and 1 clove garlic until the onions are translucent, and then add
(1) 15 ounce can of tomato sauce
(1) 12 ounce can of tomato paste
4 cups of water
1 teaspoon of dry oregano
1 teaspoon of dry basil
1 teaspoon of salt
1 tablespoon of sugar
½ teaspoon of black pepper
½ teaspoon of fennel seed
¼ teaspoon of dry red pepper flakes
Bring to a boil and stir to thoroughly mix everything. Reduce heat to a simmer and put meatballs in the sauce. Simmer for 2 hours (or see crock pot directions below).
TO SERVE: split your bread roll and put just a skim of butter on the cut side and toast it (for just a minute or so) under the broiler. Remove and load with meatballs and mozzarella cheese and put back under the broiler to melt the cheese. Enjoy!!
CROCKPOT DIRECTIONS
The recipe ingredients are the same, except use 4 cups of hot water and cook on HIGH for 5 hours. Lay a dish towel over the crockpot lid (to insulate it a little, so it will come to a simmer quicker). Once it comes to a simmer, remove the towel and crack the lid open just a bit so that the sauce will reduce a little.
NOTE: The secret to this recipe is the length of cooking time. The meatballs taste AND texture will be SO MUCH better if you cook for the full amount of time, that's why the crock pot is the perfect method to make these sandwiches.
Tuesday, August 2, 2011
CRISP BACON and GUACAMOLE SANDWICH
I first posted this idea a couple of years ago and then promptly forgot about it. However, summer is often too busy (or hot) to cook, so recently I dug into my files for a good sandwich idea and re-discovered this treat.
You will not find this delight on any health food menu and you won't find it on your weight watchers plan, but man oh man, is it tasty. Crisp fried bacon, on top of a thick layer of guacamole and topped with lettuce and tomatoes. You just have to say yes to a good sandwich some times!

The guacamole for these sandwiches is excellent:
3 avocados
juice of 1 lime
1 teaspoon salt
½ cup sweet (or red) onion diced small
3 tablespoons chopped fresh cilantro
2 Roma tomatoes diced small
1 teaspoon minced garlic
pinch of ground cayenne pepper (optional)
Mash the avocado with the lime and salt and then stir in the rest of the ingredients. You can use this right away, but the flavors blend better if it sits in the fridge for an hour or so.
Spread a nice thick layer of guacamole on your toasted bread, then top with crisp bacon, tomato slices and favorite lettuce. Eat your sandwich in the shade with a tall glass of sweet ice tea !!
Monday, February 28, 2011
SWEET & SOUR PORK RECIPE
.
You should know that I am not a big sweet and sour fan, but I love this recipe. It is extremely moist and just the right amount of sweet to sour ratio.
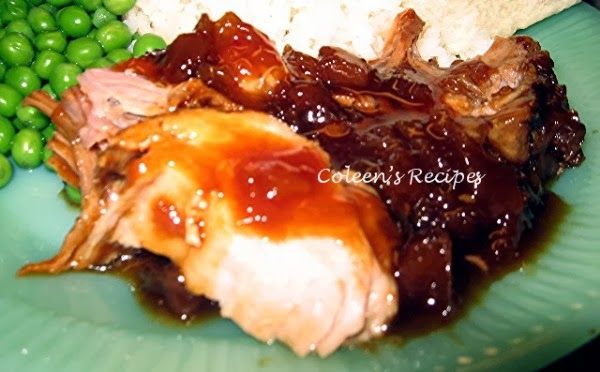
Walmart sells a small vacuum packed 2 pound pork roast that is perfect for this recipe. The package says "pork loin rib eye pork roast" and even here in Alaska, it's only $4.50!!
.
2-3 pound lean pork roast
1 cup granulated sugar (seems like a lot, but it mellows out)
½ cup white vinegar
4 tablespoons soy sauce
4 tablespoons ketchup
20 ounce can crushed pineapple (drained)
.
Brown the pork roast on all sides and put it in your slow cooker. Mix everything else and bring it to a boil, then pour it over the meat.
.
Cook on low for 4-6 hours or until very tender (spoon the sauce over the meat every once in a while).
.
That's it...super easy!! At the very end of the cooking time, I thickened the sauce a little with a slurry of cornstarch and water (right in the crockpot). To serve, slice the meat and spoon a little of the sauce over it; it's great with rice.
Now this last suggestion is not for everyone, but my picky-picky hubby absolutely loves it. On day two, I pull this pork apart and mix it with a little of the sauce (make sure you include some pineapple out of the sauce). While its still cold, I roll it into a large burrito size tortilla (folding in all the ends) and then I brown the whole sandwich in a little butter until its piping hot. Hubby is extremely UNdemostrative when it comes to food, but he ooohhh'd and ahhhhhh'd about this sandwich until the last bite.
Friday, February 26, 2010
PIZZA BUNS
.
Originally, this is a dough that my German Russian ancestors used for a hot and savory ham and sauerkraut sandwich. I decided to experiment with various fillings and they have been such a big hit with Hubby that I've made them twice this week. I've made calzones for years, but these are so much better...not bready or doughy at all and the dough raises just enough (as it bakes) to make the perfect sandwich...light, crispy and delicious.
DOUGH
¾ cup very warm water
½ cup sweetened condensed milk (not evaporated)
¼ cup vegetable oil
2 tablespoons sugar
1 large egg (room temperature)
3½ cups all purpose flour
2 tablespoons dry active yeast
1 teaspoon salt
Mix the warm water (hottest out of your tap) with the sweetened condensed milk, vegetable oil and sugar and salt. The hot tap water will cool down in temperature once it is mixed with the oil and milk (so it won't hurt the yeast). Next, whisk in the egg and the yeast. Let this sit for several minutes until the yeast looks well dissolved.
NOTE: When you first mix up this dough, it will seem stiff and dense. Don't let that freak you out...just follow the instructions and it will bake up beautifully.
Once it is well dissolved, mix in the flour (using a stand mixer is easiest) and mix with dough hook on medium speed until smooth (about 5 minutes or so). Place in a bowl sprayed with vegetable spray and cover with plastic wrap. Let this sit in a warm place for an hour or until it is double in size.
.
Remove from the bowl and cut into 8 pieces (makes 8 sandwiches). Roll each piece out into an 8 inch circle. For pizza filling, put about ¼ cup of cheese in center of circle; top with a little pizza sauce and some toppings.
I found that these were easier to shape if you sit the 8" circle in a cereal bowl before you add the fillings (see above photo). Draw up the edges of the dough and pinch them together like this
This dough is a dream to work with...it stretches without tearing and sticks together beautifully when it comes time to "pinch it shut".
A word about pizza fillings:
I filled these with sweet Italian sausage and some thin strips of pepperoni. I fried this in a pan until it was very well done, then I drained it completely and blotted all of the grease I could get out of it...I highly recommend this step. Don't add any meat that has not had the fat rendered out of it (sausage, pepperoni etc.). If you do, the fat will make the sandwich greasy and leak out of the pinched seam. Once pinched shut (make sure you pinch it totally shut...place them pinched seam side down on a parchment paper lined baking sheet. They will look like this:
Cover with plastic wrap and let them sit for 20 minutes. Bake in pre-heated 350F oven for 20 minutes. When they come out of the oven, brush them with butter. Aren't they pretty? Be careful when you first bite into them...they are SO hot inside.
I also made them the other day using a ham and cheese filling.
NOTE: These sandwiches stay super hot for an unbelievable length of time, so they would be excellent for a potluck or picnic (they are also excellent at room temperature). This dough recipe makes 8 big sandwiches, but you could easily make them smaller for a party snack.
.
NOTE: I have plans on making these, using sloppy joe filling, barbecue beef filling, bacon and egg filling and much more. I can see many uses for this sammie.
.
NOTE: The fully baked leftovers (full size) reheat, beautifully, in a preheated 350F oven in 20-23 minutes and taste exactly like they did the first time they came out of the oven.