Thursday, December 20, 2012

CHRISTMAS FUDGE

Christmas is almost here and everyone I know is running around looking for that last minute mini-gift for the mailman, a teacher, the newspaper boy or even the UPS man!!

This fudge recipe is the perfect answer!! Not only is it quick and easy to make, but it tastes great and I love that it can be made way ahead of schedule.


4 cups white sugar
1 twelve ounce can of evaporated milk
8 ounces of real butter (no margarine or spreads)

2 cups milk chocolate chips
1 cup semi-sweet chocolate chips
1 cup white chocolate chips
1 TABLESPOON vanilla
chopped nuts if desired (we like honey roasted peanuts)

In a heavy bottomed sauce pan, mix the white sugar and evaporated milk; bring it to a boil over medium high heat.  Once it is at a full rolling boil (one that you can not stir down), turn the heat down to medium and boil for 6½ minutes (stirring CONSTANTLY). I stir with a wooden spatula that has a square end and I stir in a figure 8 (the flat blade of the spoon really scrapes the  bottom of the pan well).

After 6½ minutes at a full rolling boil, remove the pan from the heat and add the butter, a TABLESPOON of vanilla and all of the chocolate.

At first the butter will sort of stay separate from everything, but if you use a whisk, it will incorporate quickly. When it's all smooth, add the nuts if you are using them (as many as you like).

Pour into a FOIL LINED 9" x 13" pan and cool overnight in the fridge. If you are using these cute little tin foil stars (instead of the 9" x 13" pan), you can just wrap them in clear cellophane bag (after they are chilled) and tie it up with a bright Christmas bow!!

 MERRY   CHRISTMAS   FRIENDS!!!

NOTE: You can make this with any flavor chocolate chips you like.
I've tried them all and the only one I DON'T recommend is using ALL semi-sweet. The three chocolate blend listed above results in a wonderful flavor (you won't taste the white chocolate, but it adds a lot to the final taste).

Note: Make sure you use a good quality butter, not a soft spread butter or a diet butter and definitely no margarine.

Monday, December 17, 2012

APPLE PIE JAM

This is another great tasting recipe in my "Gifts from the Kitchen" series.  It is very economical and it is unique enough to make a great gift for co-workers, church friends, babysitters, etc. (any time you need a small gift from the heart for friend).


It really does taste just like an apple pie!!

APPLE PIE JAM

6 cups diced granny smith apples (6 or 7 apples)
1/2 cup apple juice  (you can use water in a pinch)
1/2 teaspoon butter
3 cups granulated sugar
2 cups brown sugar
3/4 teaspoon ground cinnamon
1/4 teaspoon ground nutmeg (freshly ground is best)
(1) small box (1¾ oz.) Sure-Jell Premium powdered pectin

Dice the apples, then put them in the food processor for just a (very) few pulses. You don't want the pieces too small.

Cook the apples, apple juice and butter (in a large heavy pot with tall sides) over low heat until the apples are soft but not mushy.

Stir in powdered pectin and bring to a full rolling boil (one that does not stop boiling when you stir it); stir constantly.

When it comes to a full rolling boil, add the sugars, cinnamon and nutmeg. Stir well and bring back to another full rolling boil.  Keep it at a full rolling boil (while stirring) for exactly one minute, no longer.

Remove from heat and skim off any foam from the surface of the jam(if there is any). Pour the jam into HOT clean jars, leaving 1/4" head space. Wipe the rims of the jars with a CLEAN wet cloth and put on the two piece lids (hand tighten). 

Process in a hot water bath:  half pints for 10 minutes; pints for 15 minutes.  This recipe makes (7) half pint jars.

NOTE: As with a lot of jams that have chunks of fruit, if you aren't careful, the fruit will "float" in the jar and it won't be evenly distributed throughout the jam. It doesn't change the taste at all, but it isn't "picture perfect" for gift giving either.

To avoid that:  After you take the cooked jam off of the heat for the last time, Sit it on a towel or a pot holder so that the pan stays as hot as possible. Let  the hot jam sit in the hot p an for five minutes before you put it in the HOT jars. Stir the hot jam every 60 seconds or so with a CLEAN spoon. After the five minutes is up, put the jam in the hot jars and proceed with the same directions.  This little trick will stop the fruit bits from floating to the top (see above photo).


Saturday, December 15, 2012

GINGERBREAD HOUSE

Gingerbread houses make wonderful gifts. Not only are they easy (you really can't goof them up because frosting fixes everything) but they are an impressive GIFT FROM THE KITCHEN!!

You can make them out of gingerbread dough, like this one (it is delicious and smells fantastic), or you can make them out of graham crackers (glued together with royal frosting). You can make them simple or elegant. You can use any candy, cereal, cookies, crackers or pretzels you have on hand... let your imagination be your guide.
CLICK TO ENLARGE

Upside down (and frosted) ice cream sugar cones (decorated with sprinkles) make wonderful Christmas trees next to your gingerbread house. Pretzels make perfect fences, marshmallows make cute snowmen and if you really want to get fancy, you can use tufts of cotton candy coming out of a chimney for smoke and marshmallow cream frosted around the bottom of the gingerbread house makes wonderful snow ....the sky is the limit. Decorated gingerbread houses have a LONG shelf life if you use royal frosting (recipe below). It dries rock hard and is very strong.

5 cups all purpose flour
2 teaspoons ground cinnamon
2 teaspoons ground ginger
1/2 teaspoon ground cloves
1/2 teaspoon baking soda
1/2 teaspoon salt
1 cup vegetable shortening
1 cup sugar
1/2 cup molasses
2 eggs

Beat the shortening and sugar together until well mixed and creamy. Add the molasses and eggs and beat until well combined.

Combine the flour, spices, baking soda and salt and slowly add it to the shortening-sugar mixture; beat until everything is smooth. 

You will be rolling out the gingerbread house pieces on the BACK of ungreased cookie sheets. The reason for this is so that after you cut out the pieces, they don't have to be moved before baking and they won't get mis-shapen.


CLICK ON THIS PICTURE TO ENLARGE

Use the above measurements to make a pattern on paper or a manila folder, even waxed paper will work. Roll out some of the dough right on the back of a big cookie sheet, using a lightly floured rolling pin, to about 1/8" thick.

Lay the paper pattern pieces right on the rolled out dough and cut the dough out with a sharp knife. Remove any excess scraps so that just the gingerbread piece is left on the back of the cookie sheet. Using the BACK of the cookie sheet also makes it a lot easier to slide the baked cookie onto a cooling rack (no cookie sheet "edge" to deal with.

Bake the pieces in a pre-heated 350° oven for 10-12 minutes or until lightly golden around the edges. Let the baked pieces cool on the pan a little before you try to remove them. Cool them completely on a wire rack.

Now the fun starts!!

ROYAL FROSTING 
This is what you glue the pieces together with

3 1/2 cups powdered sugar
3 egg whites (if you are going to eat this use egg white powder)

In a large bowl, beat the sugar and egg whites until smooth. Place in a pastry bag with a star tip (or place in a resealable plastic bag and cut the corner off).

Use a large serving tray or a foil lined piece of heavy cardboard to hold the finished gingerbread house. Put a few dots of this royal frosting on the underside of the "floor" piece and stick it to the serving tray. This will keep it from sliding around if its moved.

Lay an end and one side of the gingerbread house down flat(where they are supposed to go) around the edges of the "floor". Pipe a generous line of the royal frosting around the edges of each piece.

Carefully lift and press the edges of one end of the house to the side of the house.Repeat for the other side.

Now, I've made these for years, and there is a trick I'll share with you.  Get the ends and sides up and use a little extra royal frosting on the seams but DON'T put on the roof until the next day.  If you wait until the next day, the walls will be VERY strong and there is no chance that the roof will be too heavy.

Day two, put the roof on and let the royal frosting harden until day three......now you are good to go, you can almost drive a truck over it after this point, and it won't break on you.

White tree's with sprinkles, green trees with sprinkles, pretzel fences, gum drop topped candy cane's, Necco shingles (frosted shredded wheat also makes great shingles).

This older photo is a "house" I made using chocolate graham crackers. I hope you try it. It might seem complicated, but once you make ONE......you'll be hooked.

NOTE: If your making this to eat (some people eat them, some people just display them), make the royal frosting using powdered egg whites (sold in the baking isle). If you are going to let little guys eat the gingerbread house..... use royal frosting to glue the structural pieces together, but use a softer frosting to embed the shingles or frost the trees. It makes it easier for the kids to "pick off" the candy goodies.
NOTE:  Royal frosting dries out almost instantly if it isn't covered with plastic wrap (that is why it makes such a great frosting "glue". Keep a wet dish towl over your frosting bowl while you work.

Thursday, December 13, 2012

CROCKPOT SHORT RIB TACOS

The next two weeks are very busy "baking" weeks for me, how about you? I've made three different kinds of jam to put in gift baskets, and now I'm starting the fun stuff like cookies, breads and a gingerbread house.

While I'm happy to be in the kitchen, I'm not as happy about cooking real food (like dinner), so my crockpot is getting a workout while I have fun baking cookies.

Today's post came about the other day when I had some BONELESS beef short ribs thawed out and I had no clue what to do with them.  I decided to make boneless short rib tacos and they were SO GOOD, I will definitely be making these again!!

 
Start with 2½ pounds of BONELESS beef short ribs. I'm sure every butcher shop has their version, but the ones I use look like this and they are about 1/2" thick:
 

In a small cup, mix 3 teaspoons of chili powder, 1 teaspoon of ground cumin (don't leave that out), 1 teaspoon of salt, 1/4 teaspoon of black pepper, 1/4 teaspoon of oregano and 1 tablespoon of dry onion flakes. Mix well and sprinkle both sides of the meat evenly as possible (no need to brown the meat). 

Put the seasoned meat in the crockpot and top with a 4 ounce can of undrained mild green chile's (I use Ortega).


Cook on low for 6 hours or until they are fall apart tender (it really depends on how thick the meat is). Don't add any liquid.

 
Remove the meat from the crockpot and cover with foil to keep warm for a few minutes. There will be about a cup of broth in the bottom of the crockpot...thicken it and coat the meat with the "taco gravy". Each boneless short rib makes one awesome taco!!

 
The leftovers (sliced on the bias) made fantastic grilled beef and cheese subs.


Tuesday, December 4, 2012

GIFTS FROM THE KITCHEN

Over the Christmas season, I will be posting a variety of easy recipes that I'm calling GIFTS FROM THE KITCHEN. The beauty of this idea is that you can make these gifts far in advance of your hectic holiday baking schedule and they will be "waiting in your pantry" for that neighbor, school teacher, office friend or unexpected last minute guest on Christmas Eve!! (check out link at end of this post for some wonderful (and free) "From the Kitchen of..." gift tags you can download).

My first GIFT FROM THE KITCHEN post is for Blueberry Jam... a quick and easy recipe that uses frozen blueberries (I don't even thaw them first). This jam has a wonderfully fresh taste!!


BLUEBERRY JAM (makes 8 cups of jam)

5 cups finely chopped frozen blueberries (see notes below)
2 tablespoons lemon juice
7 cups granulated sugar
1/2 teaspoon butter
(2) 3 ounce pouches of liquid Certo pectin

Prepare your jam jars. Personally, I put them through the hottest setting on my dishwasher, and then let them sit/steam in there while I make the jam. For the lids, I wash and rinse them, then let them sit in a pan of almost boiling water, while I make the jam.

We like a jam that doesn't have a lot of serious "chunk-age" (as picky-picky husband calls it) so I put the frozen blueberries in the food processor (a few cups at a time) and process them until they are about the size of rice, so the final jam has the consistency of a fruit spread. If you like "chunk-age" in your jam, just don't chop the berries so small.

The recipe calls for five cups of chopped berries. I use a regular measuring cup and pack as many chopped berries as I can in it (do that for each of the 5 cups). Place the chopped berries, lemon juice, sugar and butter in a large heavy kettle.

Heat on medium, stirring constantly, until the sugar is dissolved.  Increase the heat to medium high and bring it all to a FULL ROLLING BOIL (one that will not stop boiling when you stir it).

Remove from heat (but don't shut off the burner) and add BOTH pouches of liquid Certo pectin (make sure you squeeze it all out of the pouch). Put the pan back on the heat and bring the jam back to a FULL ROLLING BOIL FOR ONE MINUTE.

Turn the heat off and skim any "foam" that is on top of the jam  (if there is any) and fill HOT jars, leaving 1/4" of head space.  Wipe rims of glass jars with clean, wet towel. Put on the two piece lids and tighten. 

Process in hot water bath: Pints for 15 minutes or half pints for 10 minutes.

NOTE: If you decide to thaw the berries (I never do)make sure you do not rinse them or drain them (you will want to include any berry juice that results from thawing.

NOTE: I can't tell you exactly how many pounds of frozen blueberries makes 5 cups of chopped berries. I'm guessing that I used about 1½ or 2 pounds?

NOTE: This recipe uses LIQUID pectin, I have never made this with powdered pectin. Certo is made by Sure Jell and there are two 3 ounce pouches of liquid pectin in each box.
NOTE: I found a trick in an OLD cookbook that has worked wonders to eliminate "floating jam pieces"...those bits of fruit that work their way to the top of each jar, but THIS STEP IS NOT NECESSARY!!! IT IS SIMPLY COSMETIC!!!

Right after you take the jam off of the heat for the last time, let it remain in the hot pan for FIVE MINUTES; gently stir (with a sterile spoon) every 60 seconds. It really does eliminate problems with floating fruit).

NOTE: I found some fantastic gift tags for "Home made gifts from the Kitchen" that you can download (free) at: www.unsophisticook.com   CLICK HERE       You can print them on cardstock or photo paper and they look excellent!!

Friday, November 30, 2012

EASY THIN MINT COOKIES

Do you like Girl Scout thin mint cookies as much as I do? If so, you are in luck with this super easy, super quick, TWO INGREDIENT recipe.

They are so EASY to make, that I can't even call this a "recipe" because it uses all pre-prepared ingredients and it REALLY DOES taste just like a thin mint cookie!! 


I put a little extra white chocolate decoration on these, just for fun,
but it certainly isn't necessary.

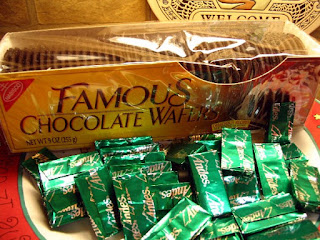
You will need some Nabisco Famous Chocolate Wafers and some Andes (creme de menthe) chocolates.....that's it!!
 
The chocolate wafers come in a 9 ounce package and I found the Andes Mints (those creamy little chocolate mints with the green center) in a 4.67 ounce package.  There are 28 mints in the package and one package will do a dozen cookies (I found the mint packages for $1.60 here in Alaska, so hopefully you can find them even cheaper.

I unwrapped and then melted the chocolates in my microwave for about 30 seconds...stirred and then microwaved them for another 10 seconds (stir until the chocolate is smooth and shiny). Dip the chocolate wafers in the melted chocolate (both sides) and place on some parchment paper (or Silpat). Stick them in the fridge (I used the freezer) for about 5 minutes to "set" the chocolate......that's it!!  


NOTE:   I noticed that they now sell Andes Mint  baking chips (next to the chocolate chips).


Monday, November 19, 2012

HOME MADE PANKO CRUMBS

Panko (breading) crumbs are the absolute best for many, many recipes. I recently used them to turn "ho-hum" shrimp into "Wow, these are GREAT" shrimp.  I've heard of people using Panko in meatloaf and meatballs (I haven't tried that yet) as well as a ton of other recipes.

My biggest problem with panko bread crumbs is that they can be expensive AND they are NOT something I routinely keep in my pantry.  That's why I was thrilled to make this discovery!!

Panko bread crumbs are different from standard bread crumbs because they are a made from SHREDDED bread, not bread crumbs.  With that in mind, I FROZE 4 slices of regular (cheap) sandwich bread. I  then cut the crusts off and cut the resulting "squares" of sandwich bread in half.  I then stacked them up and fed them through the SHREDDER in my food processor.  This is what they looked like:

 
They were light and fluffy, just like
commercial Panko crumbs!!

I then sprinkled them evenly over a dry cookie sheet, gently spreading them as thin as I could and baked them in a pre-heated  300° oven for about 10 minutes.  Actually, they were dry in 8 minutes, but I let them stay in their for a couple more minutes to be sure.  Just don't let them turn color.

This "recipe" will make about 1½ cups of crumbs, so if you double the recipe, make sure you bake it on two cookie sheets so the crumbs can spread out and dry properly.
 
 
I'm thinking of making whole wheat panko crumbs next!!

Sunday, November 18, 2012

CROCK POT SHORT RIBS

 We are starting our 4th day of 20° weather combined with non-stop wind gusts up to 50 mph... cold wind that goes right through your bones...that means it is definitely crockpot time.

I found this recipe on food.com and picky-picky husband gave it two thumbs up this evening. It smelled wonderful cooking all afternoon and we are already envisioning hot sandwiches with the leftovers. The meat was fork tender in 6 hours and the sauce thickened itself to a wonderful consistency. This is a great winter recipe.

CROCK POT BONELESS SHORT RIBS

2½ pounds boneless beef short ribs
1/3 cup flour
1 teaspoon salt
1/2 teaspoon pepper

Mix the flour, salt and pepper and coat the boneless short ribs with it. Brown the meat in
1/4 cup of butter then put them in the crockpot.

In the same frying  pan, mix:
1 cup chopped onion
1 cup beef broth
3/4 cup red wine vinegar
3/4 cup brown sugar
1/4 cup chili sauce (I used Heinz Chili sauce)
2 tablespoons ketchup
2 tablespoons Worcestershire sauce
1 teaspoon chili powder
2 tablespoons minced garlic (see note)

Bring to a boil then poor it over the meat in the crockpot.  Cover and cook on LOW for 9 hours Warning, this HAS to be a mistake). I know all crockpots are different, but our ribs were fork tender in 6 hours, so keep that in mind.

NOTE: Hubby is allergic to garlic, so I left it out. 

Thursday, November 15, 2012

CLASSIC BANANA CREAM PIE

Every family holiday dinner, I make way too many desserts. There is usually a cheesecake, a cream/pudding type pie, a fruit pie, cookies and something "experimental". That just means it is a recipe that I really want to make but I know picky-picky husband wouldn't touch it, so I need my family to "step in" and try it. 

As fun as it is to try new recipes, the old classics are always a hit; this banana cream pie is a tried and true family classic; it is the "real deal". It has a baked graham cracker crust, cooked vanilla custard, bananas and the most delicious whipped cream topping I've ever tasted (it has cream cheese in it)

GRAHAM CRACKER CRUST
1½ cups finely crushed graham crackers
¼ cup white sugar
6 tablespoons melted butter
Mix everything well and pat into a 10" pie plate. Bake at 350 for 8 minutes.

PIE FILLING
3 tablespoons cornstarch
1 and 1/3 cups water
1 14 oz. can sweetened condensed milk (see note)
3 egg yolks, beaten
2 tablespoons butter
1 teaspoon vanilla extract
2 medium ripe bananas (cubed)

In a heavy saucepan over medium heat, dissolve the cornstarch in the water; stir in the sweetened condensed milk and egg yolks. Cook until thickened and bubbly remove from heat; add butter and vanilla. Set aside to cool slightly. Cube the bananas and fold into the slightly cooled pudding. Pour into cooled crust and lay some plastic wrap on the surface of the filling so that it doesn't form a skin. Chill in the fridge for about 3 hours. Frost with whipped cream topping.

WHIPPED CREAM (Stabelized)
I hope you do not skip this step because it really is delicious and "makes" the pie. This is my new "go to" whipped cream recipe.

(1) 8 ounce cream cheese (room temperature)
½ cup granulated sugar
1 teaspoon vanilla extract
2 cups heavy cream

With your electric mixer, beat the cream cheese, sugar and extracts in a large bowl until smooth (scrape sides to make sure you don't have any cream cheese sticking to the interior of the bowl). While the beaters are still running, slowly add the whipping cream (stop a couple times and scrape the bowl). Beat until you get stiff peaks. This makes enough topping to cover a 10" pie generously.

NOTE: Make sure you use sweetened condensed milk in the pie filling (and not evaporated milk).

Sunday, November 11, 2012

CREAM OF ____ SOUP MIX

I am so excited to share a "discovery" I found on the Utah State University web site. Maybe you already knew about this one, but I sure didn't.

It is a recipe for a simple dry mix that can be used in place of any "cream of ... soup"  in most recipes. 

How many times have you wanted to make a quick inexpensive casserole for your family, but the recipe takes $3+ worth of cream of chicken soup ?!? Problem solved!!

BASIC SOUP or SAUCE MIX
2 cups powdered non-fat milk
3/4 cups cornstarch
1/4 cup instant chicken bullion
2 tablespoons dry onion flakes
2 teaspoons Italian seasoning (optional)

Mix ingredients and store in an airtight container.  The above jar is equal to NINE (10½ ounce) cans of "cream of .... soup"!! No need to refrigerate the dry mix.

For any recipe that calls for a creamed soup, mix 1¼ cups of water with 1/3 cup of the above dry mix. Whisk together until smooth and cook (or microwave) until thick.  That's it!!   Add it to any casserole like you would a can of soup!!

The USU web site has a lot of recipes using this mix (they call it the Soup or Sauce mix). Here is the web address: SOUP OR SAUCE MIX

I'm thinking I will make another batch using beef bullion and some dehydrated mushrooms for mushroom soup!!  With the holidays coming up, I usually buy mass amounts of creamed soups, but not this year!!

The USU recipe link posted this cream of tomato soup recipe:
1/3 cup soup or sauce mix
1¼ cups cold water
Cook until thick, then stir in:
2 cups tomato sauce
Heat back up...serves 3

What could be easier? I threw in a pinch of red pepper flakes  for a little zip and a pinch of sugar.  The possibilities are endless!!

Sunday, November 4, 2012

HOT SPINACH and ARTICHOKE DIP

Party season is coming up and if you are like me, you are starting to surf the Internet for that "next new and exciting" appetizer or party snack recipe. I keep all of those "potential recipes" in a folder on my desk and once in a while I look through it and say to myself..."what was I thinking?!?"  So much for late night Internet surfing I guess!!

Today's post is one of those traditional "never fail" recipes that seems to please everyone. I make it with low fat ingredients but you can't tell it. This tasty dip is hot and creamy (it stays hot for a while which is nice)and very easy to make.


8 ounce cream cheese (low fat ok)
1/4 cup sour cream (low fat ok)
1/4 cup Parmesan cheese (grated, not powdered)
1/4 cup Romano cheese (grated)
2 cloves garlic minced (I used roasted from jar)
1/2 teaspoon dry basil
1/4 teaspoon garlic salt
salt and pepper to taste
(1) 14 oz. can artichoke hearts (rinsed)
1/2 cup red bell pepper (chopped finely)
10 ounces fresh baby spinach
1/4 cup shredded Monterrey Jack cheese

Plunge fresh spinach into boiling water for about 30 seconds, remove and put into large bowl of ice water to stop the cooking. Drain and squeeze dry and roughly chop.

Drain the artichokes and rinse under cold running water, then chop into small pieces.

Mix everything together and place in a (lightly greased) small oven proof dish. Bake at 350F for 25 minutes. Serve with pita chips or any sturdy cracker.

NOTE: This can also be baked in a hollowed out bread bowl instead of a baking dish.  

Wednesday, October 31, 2012

PUMPKIN SPICE CUPCAKES

This is a wonderful recipe for several reasons: the cupcakes are super moist and tender, they are mildly spiced and the batter goes together with one bowl and a whisk; what could be easier? They are so tasty, that they really don't need a frosting, although I like to serve them frosted with a simple maple flavored butter cream (pumpkin and maple are MADE for each other). Everyone loves these simple cupcakes!!

In a large bowl, mix together with a whisk:

(1)  15 ounce can of pumpkin (not pie filling)
1 2/3  cup of granulated sugar
1 cup vegetable oil
4 eggs
2 teaspoons ground cinnamon
(scant) 1/2 teaspoon ground cloves
(scant) 1/4 teaspoon ground nutmeg

Whisk together until very well mixed, then add:

2 cups all purpose flour
2 teaspoons baking powder
1 teaspoon baking soda
1 teaspoon salt

Mix well, then stir in 1/2 cup of raisins (optional).

Fill cupcake papers 3/4 full.  Bake in a 350 oven for 23-25 minutes (my electric oven takes 23 minutes) or until toothpick tests clean.  Remove and cool.

After the cupcakes have cooled, dust the tops with powdered sugar or frost with your favorite frosting.


I never measure my "everyday" frosting, but here's a stab at it:

Melt 3 tablespoons butter; add 1 teaspoon vanilla extract and 1/2 teaspoon maple extract.
Add 1 to 1½ cups of powdered sugar and a couple tablespoons of cream.  Whisk till smooth. If it seems a little to dry, add another tablespoon of cream.  If it seems a little too wet, had another spoon of powdered sugar.  

MAKES 24 CUPCAKES

Thursday, October 25, 2012

TRICK or TREAT !!

I recently came across this great trick or treat idea through an old friend who found it on feeling crafty.org   It obviously doesn't need "instructions" or a "recipe" but I just thought it was so clever and I wanted to share it.

I can see a big bowl of these ready for
trick-or-treaters on Halloween!!


Monday, October 22, 2012

SWEET AND SAVORY RICE


I love savory rice and picky-picky husband loves sweet rice. As a matter of fact, his all time favorite rice is plain white rice with butter and sugar on it, go figure!!

Today's rice is one that we BOTH enjoy. It goes very well with almost anything, but we especially like it with pork chops or baked ham.

.
2 ¼ cups chicken broth
1 tablespoon butter
1 cup raw white rice
½ teaspoon onion powder
½ teaspoon salt
¼ teaspoon black pepper
1 teaspoon ground cumin
1 large cooking apple (cored, peeled and diced)
1/3 cup dark brown sugar
1/3 cup golden raisins
½ cup chopped toasted pecans
.
Melt the butter in a medium saucepan and add the RAW rice.  Cook/stir the rice until it turns sort of opaque white. This will help keep the rice grains separate while it cooks.

Add the chicken broth and everything else in the recipe, except the pecans.  Bring to a boil and then turn the heat way down so that it is at a low simmer. Put a tight fitting lid on the pot and let it simmer for 20 minutes (don't peek).

Remove the pan from the heat, gently stir in the toasted pecans and put the lid back on for 5 minutes (but with no heat).

That's it!! The dark brown sugar and fruit lend a mildly sweet flavor to the rice and the ground cumin gives it a full flavor. This rice makes an excellent buffet dish since it also tastes great at room temperature. I hope you will try it.

NOTE: I've also used canned peaches (when I was out of apples) and it tasted great.

NOTE: Use vegetable broth instead of chicken broth if you are vegetarian

Friday, October 19, 2012

MAPLE FLAVORED SYRUP

Our children were raised on homemade pancake syrup for two reasons. First and foremost, it was economical and easy to make. Secondly, the kids didn't care for the (waxy?) aftertaste of commercial pancake syrups, so homemade syrup was their request. 

Now, I know there are people who will write and say they can't eat anything but real maple syrup; I understand that. However, the price of real maple syrup is almost frightening, these days, ($25 for a small jug here in Alaska) and this homemade syrup is a tasty alternative. I like to make it the night before and pour it into a mason jar and let it sit at room temperature (until morning). I then microwave it for a minute or so when the pancakes are done.


If you are one of those people who grew up with homemade syrup, you know that it is a lot thinner than some of today's commercial syrup (especially when its very hot). I'm guessing that commercial syrup is thickened with high fructose corn syrup. On the other hand, it is a little thicker than real maple syrup.

This recipe is SUPER quick and easy:

1 cup water
1 cup granulated sugar
1 cup brown sugar (I use dark brown sugar)
3/4 teaspoon maple flavored extract  (see note)
1/2 teaspoon vanilla extract

Put everything in a large, heavy pan (use a DEEP pan because this syrup will bubble up as it boils).

Boil hard (not stirring) for 3-4 minutes, then remove from heat.   You can use it right away, but it will seem thin.  The syrup thickens as it cools. Use it just like you would any pancake syrup.

We like to eat the syrup warm (not hot).

NOTE: I like to use dark brown sugar, but light brown sugar works just as well (but syrup will be  lighter in color).

NOTE: Bring the ingredients up to a rapid-crazy boil over high heat. The liquid will try to "climb" the walls of the pan, so make sure your pan is big enough. Once it's boiling like crazy (don't stir), turn the heat down to medium high and boil for 3 to 4 minutes. I boil mine for 3 minutes, but if you want the syrup to be a little thicker, go for 4 minutes. If you boil it much longer than that, the syrup will form a few rock candy crystals in the bottom of the jar (fun to eat).

NOTE:  I prefer a maple flavored extract called Mapleine (Walmart carries it), but if you can't find it, regular maple flavored extract works well too. My family says they can't tell the difference.

Monday, October 15, 2012

CHEWY OATMEAL WHOOPIE PIES

Whoopie pies are two cookies, layered back to back, with a thick layer of frosting in between. Some have a cake texture, some are crunchy and some (like today's post) are chewy.  I like to wrap them individually so the cookies stay on the soft side (plus, since they are pre-wrapped, they are easy to toss into a lunch box, sort of like home made Little Debbie's oatmeal cookies.

This recipe has the wonderful taste of "oatmeal and autumn" spices. It is also a cookie you can easily make even if the pantry is running low on everything because there are no "special" ingredients in these whoopie pies.

2 cups brown sugar (I like dark brown)
3/4 cup butter (room temperature)
2 eggs
1/2 teaspoon salt
1 teaspoon ground cinnamon
1/4 teaspoon ground nutmeg
1 teaspoon vanilla extract
1 teaspoon baking powder
1 teaspoon baking soda
2 tablespoons boiling water
2½ cups all purpose flour
2 cups quick cooking oats

Preheat oven to 350 and spray cookie sheets with vegetable spray (I don't spray, I just use parchment paper).

Cream together the butter, brown sugar, eggs, salt, cinnamon, nutmeg, baking powder, baking soda and boiling water. Beat until mixture is light in color and fluffy.

Beat in the flour and oats. Let mixture sit for about 5 minutes.

Roll into balls about the size of a small walnut.  These cookies don't "spread" a lot, so you can space them about 3" apart. Just try and make them all the same size.

Place the cookie dough balls on a prepared cookie sheet and bake at 350 for 10 minutes.  The cookies will look like they need another couple of minutes, but they don't. Remove them from the cookie sheet and place on a cooking rack. If the cookies are puffed up... very lightly tap the top of the cookie with the back of a fork.  Cool cookies completely.

COOKIE FILLING

1 cup butter (room temperature)
2 teaspoons vanilla
4 cups powdered sugar
4 tablespoons milk

Mix everything (starting with only 3 tablespoons milk) and add the other tablespoon if the frosting is too stiff.

Use the frosting, generously, to "glue" two cookies together.


Wrap cookies individually or keep them in an airtight container so the cookies will remain chewy and not crunchy.

Saturday, October 6, 2012

NO KNEAD PIZZA DOUGH

What is easier than a no-knead pizza crust? This recipe (like many I have) are a combination of several recipes, tweaked with years of experimentation on my part. This one is a keeper!!

We love a pizza crust that stays crispy underneath the filling, yet the edges are light and airy with big air pockets inside the dough. The hardest part of this recipe (that's a joke) is to remember to mix the dough the night before (it needs to sit at room temperature for 24 hours). No need to use a mixer and dough hook, just a bowl and spoon; it is super-easy.


3 cups all purpose flour
1 tablespoon yeast
1½ teaspoons salt
1 teaspoon olive oil
¼ teaspoon black pepper (optional)
1 tablespoon sugar
1½ cups warm water

In a large bowl, mix everything, using a wooden spoon.  The dough will be very wet and look more like a batter than a dough. Don't be tempted to add more flour at this stage!!


Cover the bowl with plastic wrap and let it sit at room temperature for 24 hours. After 24 hours, the dough/batter will be nearly triple in size, so use a big bowl, see all those bubbles?


After 24 hours, stir the dough. It's going to be pretty sticky, but don't freak out about it.

Heavily flour your counter top and pour/scoop the dough out onto the flour.  Generously sprinkle flour over the top of the dough too.  Fold the dough back onto itself a few times. This is a little messy/sticky, so keep flouring your hands. After you've coated the dough with flour and folded it over a few times, cut it in half (makes 2 medium pizza's).

Preheat your oven (with pizza stone on center rack) to 450 degrees.
Put each piece of dough on its own piece of parchment paper and using floured hands, gently pat it into a circle, leaving the edges thicker and the center as thin as you can. Add toppings and brush the edges of the crust with a little water (not much).
The dough is going to stay on the parchment paper when you put it onto the hot pizza stone. To do this, I transfer the paper and dough by lifting it with a rim-less cookie sheet, and then I slide the whole thing off of the cookie sheet and right onto the stone. Bake it for 8 minutes.

After 8 minutes, pull the parchment paper out of the oven. Turn the bake cycle off and turn on the broiler cycle for about 1 to 2 minutes (watch closely). The hot pizza stone will continue to bake the underside of the crust, but the broiler will brown the toppings nicely.

We love those light airy pockets inside the crust!!

Monday, October 1, 2012

NO ROLL JELLY ROLL

Last year, I posted a recipe for an old fashioned jelly roll cake.  I heard from several people who said they had fond memories of their mom or grandma making jelly rolls, but they were afraid to make one themselves because they were nervous about rolling the cake.

Rolling the cake isn't hard, as long as you follow a few strict rules, but it IS messy with all of the "sprinkle towel with powdered sugar" stuff. That is why I came up with this "NO ROLL JELLY ROLL".  I think it is every bit as pretty as the classic jelly roll Grandma used to make but it is MUCH EASIER !!


This is definitely going on my holiday table this year

Basically, I baked the same 10 x 15 sponge cake that I use in the jelly roll, but I cut it into thirds and stacked them with jam in between each layer and on the top, then drizzled vanilla glaze over. I'm very happy with how it turned out. It is so simple, I know I will be making it a lot more often.

3 large eggs
1 cup granulated sugar
1 teaspoon butter extract (see note)
1 teaspoon vanilla extract
1/3 cup water (see note)
1 cup CAKE FLOUR
1 teaspoon baking powder
1/4 teaspoon salt
1 cup jelly or jam  (see note)

Preheat oven to 375 then line a 10" x 15" pan with parchment paper and spray the paper with cooking spray, set aside.

Beat the eggs, on high, until very thick and lemon colored (takes about 5 minutes).  After five minutes, and while the mixer is still running on high, slowly add the sugar.

Put the butter extract into a 1/3 measuring cup and then fill the cup with water (extract + water should = 1/3 cup). Add the extract-water and vanilla extract to the egg mixture and mix well.

Sift the cake flour, baking powder and salt into the egg mixture and beat just until the batter is smooth (I do this step with a whisk).

Pour batter into prepared pan and bake in preheated 375 oven for 12-15 minutes (my electric oven takes 15 minutes) or until toothpick in center comes out clean.

Remove from oven and slide a sharp knife around the edges of the cake to loosen them.  Let the cake cool in the pan for 10 minutes before removing.


Place waxed paper or saran wrap on a cookie sheet (spray the paper/plastic wrap with cooking spray) and turn the cake out onto the cookie sheet.  This will help you transport the cake while its still hot.  The cake is much easier to cut and handle if its chilled, so I put the cake in the freezer for about half an hour before I tried to cut it.

When you are ready to assemble the cake, slice a VERY THIN edge off of each side of the cake (not necessary, but looks prettier).  Cut the cake in thirds.

Place the bottom layer on a serving plate and spread with jam (stir the jam to loosen it up before spreading). Repeat with next two layers.

Spread jam on the top of the cake and then drizzle with vanilla glaze. 


VANILLA GLAZE
1/3 cup melted butter
2 cups powdered sugar
1½ teaspoons vanilla extract
¼ teaspoon almond extract
2 tablespoons milk

Mix all together with a whisk.

NOTE: This recipe works best with a jam that doesn't have big pieces of fruit in it. Personally, I like Smuckers Simply Fruit; it not only tastes great but its PERFECT for this cake. Just make sure you stir or whisk the jam before spreading it, it will soften up and get smooth.

NOTE: If you do not have butter extract, just double the vanilla extract.

NOTE: This cake gets more moist after it sits for a few hours because the jam sinks into the cake a little.

Friday, September 28, 2012

PEANUT BUTTER CREAM BARS

I've been making these bars since my kids were little; now I make them for my grandchildren. I think that is the mark of a great recipe, don't you? 

This cookie bar has a creamy (peanut butter and sweetened condensed milk) layer between two chewy oatmeal cookie layers. As if that wasn't enough, the finished bars are drizzled with a peanut butter frosting glaze. They are SO GOOD and they make a great bake sale item.

 
 2 cups raw quick oats
1¾ cups brown sugar
1½ cups all purpose flour
1 teaspoon baking powder
½ teaspoon baking soda
1 cup butter
2 cups chocolate chips (or 1 cup mini chocolate chips)
1 beaten egg
14 ounce can sweetened condensed milk (not evaporated)
1/3 cup creamy peanut butter

Combine the first 5 ingredients in a large bowl and then cut in the butter (like you would for a pie crust). I do this step with an electric mixer, but don't do it with a food processor because it will chop the oatmeal to finely.

Remove 1¾ cups of these crumbs and put them in a small bowl with the chocolate chips and set it aside.

Mix the beaten egg into the remaining crumb mixture (not the part with the chocolate chips) and mix well. Press this mixture into a greased (I use parchment paper instead of grease) 10" x 15" x 2" baking pan and bake in preheated  350 oven for 15 minutes.

While the base is in the oven, whisk the sweetened condensed milk together with the creamy peanut butter and set aside.

When the partially baked crust comes out of the oven, drizzle the milk-peanut butter mixture evenly over the crust. Sprinkle evenly with the reserved crumb-chocolate chip mixture and bake, at 350, for another 15 minutes.

Drizzle the baked bars with peanut butter frosting while they are still warm. Cool completely in the pan before cutting into squares.


NOTE: For ease of cutting, I line the pan with parchment paper and leave the sides a little long, so I can grab the COOLED bars and lift them out of the pan for slicing.

PEANUT BUTTER GLAZE
1/2 cup creamy peanut butter
2 tablespoons butter soft
1 teaspoon vanilla extract
2 cups powdered sugar
4 tablespoons milk

Now keep in mind, I NEVER, and I mean NEVER measure ingredients for a cake glaze, so I'm hoping these amounts work for you.  Heat the peanut butter and butter in the microwave until it is nice and soft.  Add the vanilla, milk and sugar and whisk till smooth.  If it seems a little dry, just add another tablespoon or so of milk. If it seems too soupy, add a tablespoon or so more powdered sugar.  When the glaze is nice and smooth, drizzle it over the warm bars.